ALPACA: Actionscript LDU Point-And-Click Adventure
Version 2.1
New in 2.1
- Save games have editable IDs to avoid conflicts with multiple projects or versions of the same project
New In 2.0
- Save and restore games in Flash Player's local memory!
- External files have switched from XML to the much-more-readable JSON format
- Various bug fixes and code cleanup
Getting Started: A Guided Tour of the Sample Project
Contents
This tour through the sample project files will explain how the different classes work with each other and with the main .fla file. You will need to understand the fundamentals of programming and Actionscript syntax to make sense of all this. If you're new to Flash and/or programming, I recommend you check out some of the tutorials at Foundation Flash to give you the knowledge base you'll need to make use of ALPACA.
Or you can just dive right in and pick it up as you go. That's basically what I did. Let's get started with our Flash file, alpaca_sample_project.fla.
alpaca_sample_project.fla
Open up alpaca_sample_project.fla and let's take a look. The first thing you'll see is nothing, just a blank stage. All the movieclips and classes are loaded dynamically by the Engine class. Click on the blank stage and take a look at the Class field in the Properties window.
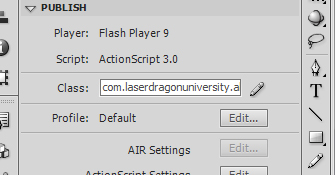
It's cut off because it's long, but the full path is com.laserdragonuniversity.alpaca.Engine. If you looked at the project folder, you'll find that this refers to the file com/laserdragonuniversity/alpaca/Engine.as. Flash will load this and execute its code as soon as you publish the file, so Engine.as is the core of all our code for this game. We'll dive into our Actionscript files in a little bit.
Let's take a look at the Library. I've organized all the elements of the .fla file into these folders, which should hopefully be self-explanatory.
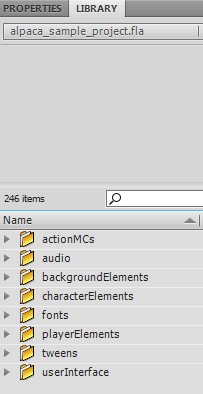
Feel free to reorganize the library as you see fit - it won't affect code execution at all. Open up the playerElements folder and double-click on Player.
Player
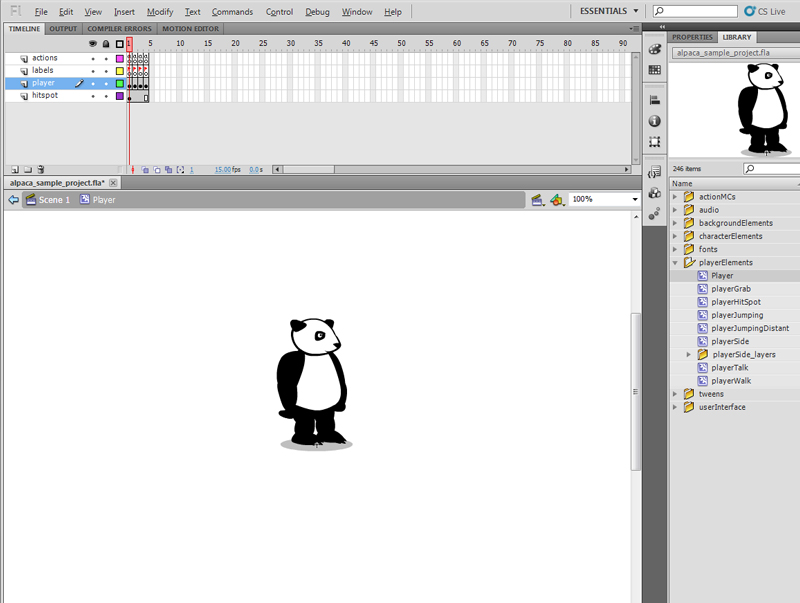
That's Al the Panda, our protagonist for this game. Note that his name in the library is capitalized. That's because Player is not just a movie clip in this .fla file, but a class. Right-click on Player in the Library and select "Properties" to see what that means.
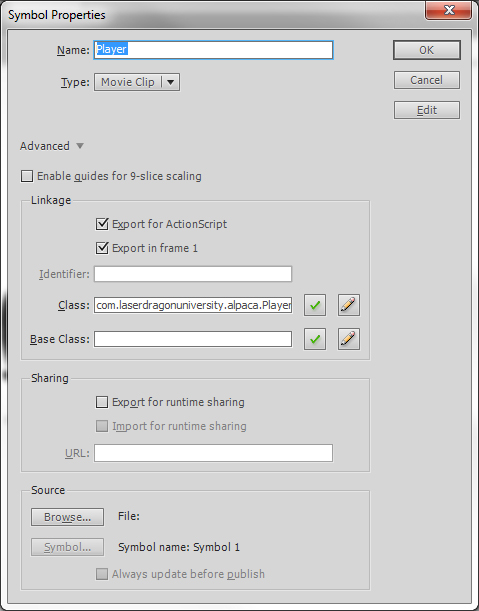
Note that "Export for Actionscript" is checked. This is vital. If you don't check this box, you won't be able to call up an element from your library using code. Actionscript will be completely blind to its existence. Note also that the Class dialog contains com.laserdragonuniveristy.alpaca.Player. This is likewise vital - it means that this movie clip is joined at the hip with the file com/laserdragonuniversity/alpaca/Player.as. That .as file defines all the Player's attributes and functionality.
Take a look at the Timeline on top of your screen.
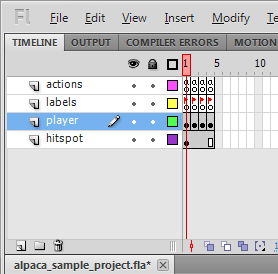
You'll notice that there are four frames for the Player class. Click on the "labels" layer and look at the Properties tab to see the names of each frame. They are default, walk, talk, and grab. The "actions" layer contains only one line of code per frame, stop();, to ensure that the playhead doesn't just loop endlessly over the different frames. The "player" layer contains a different movie clip for each frame. These are the movie clips playerSide, playerWalk, playerTalk and playerGrab, all of which can be found in the library. Once we start diving into the code, you'll see that when the player performs any of these actions, we simply change Player's frame and we get the corresponding animation. This way we don't need to grab another clip from the library and swap it out with the current Player clip, which could get cumbersome.
If you check the properties for these movie clips, you'll find that they're not exported for Actionscript. That's because we don't ever need to call these from code. Open up these movie clips and you can tweak or completely change the animations within.
If and when you create a new main character, make sure that your character contains at least four frames with the labels default, walk, talk and grab, or you'll get errors.
The bottom layer, hitspot, contains a clip of the same name made up of Al's shadow. That clip is what the engine uses to determine if the player has hit another object - more precisely, an obstacle. The Player always needs a hitspot. When creating your own player, you don't necessarily have to make the hitspot a shadow, but it does need to be there.
That's all we need to know about the Player class for now; later on we'll open up the Player.as file and go over its actual functionality. Let's just quickly review our ground rules:
Player must:
- Contain frames with the labels default, walk, talk, and grab
- Contain a movie clip named hitspot that can be used to determine when obstacles are encountered
tundra: The First Background
Now let's move on. Go ahead and open up the backgroundElements folder - we're going to take a look at our different backgrounds. Open up the tundra subfolder - this contains everything you see in the first background of the game. Note that tundra, the main movie clip, is not capitalized. If you open up its properties, you'll see that it's not capitalized there either - and it doesn't have a long classpath like Player did.

Why is that? Well, tundra is just a regular movie clip, and it has no corresponding class / .as file. The backgrounds are all controlled by a class called Background.as, which loads these movie clips from the Library. We could make each background its own class if we wanted, but that would lead to a lot of duplicate code and some major headaches if we needed to change something. So I've kept things simple.
Double-click to open up the tundra clip.
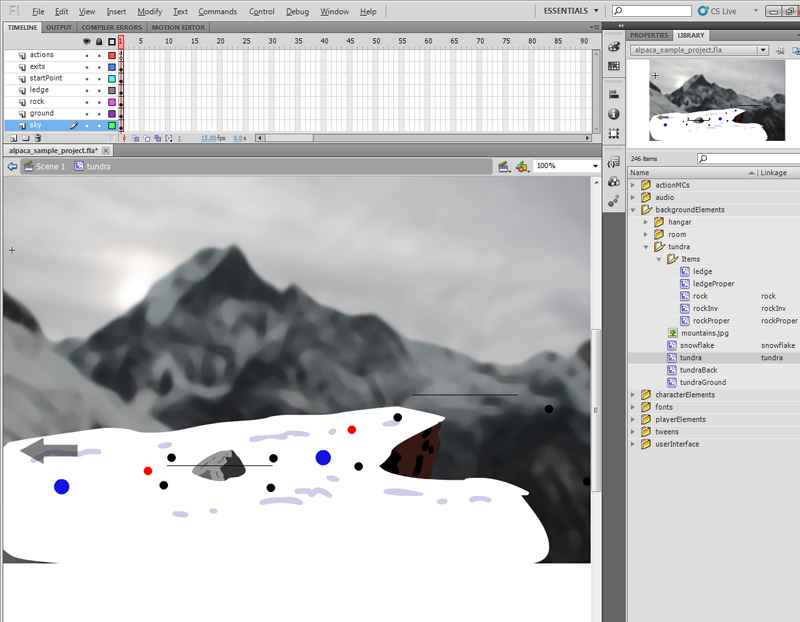
You probably don't remember all those lines and colored dots from when you played the demo. They were there, but they were made invisible at runtime. Keeping them visible here makes it easier to lay out your scene. Now, let's break this clip down layer-by-layer.
The "sky" layer is that big image of a mountain in the back. Click once on it and look at the Properties - this is a movie clip with the instance name mountains_L. That instance name is very important; it tells the game engine what kind of properties, if any, this movie clip has. In this case, "mountains" is the display name of the clip (you'll see it show up on the bottom right of the screen - "Look at MOUNTAINS", etc.). The "_L" part tells the engine that the player can look at this clip, and get a description. All the interactive elements in your background have their properties assigned this way. Here's a key:
Item Properties
- _L = Look-at-able (player can examine the element for a description)
- _U = Usable (player can manipulate the object in some way. Even if _U is not present, the player still has the option to "use" the item; they'll simply get a description of why they can't use it)
- _G = Gettable (player can add this item to the inventory)
- _T = Talk-to-able (allows dialog with other characters)
- _O = Obstacle (something the player needs to walk around)
- _F = Foreground element (a part of the background that should always be on top of everything else)
If you click on the rock in the middle of the scene, you'll see that its instance name is rock_O_G. The _G property automatically assigns the _L and _U properties, which means rock_O_G is an Obstacle, is Look-at-able, is Usable, and is Gettable. It doesn't matter what order the letters come in, as long as they're after the clip's display name.
The _U property automatically assigns the _L property.
The _G and _T properties automatically assign the _L and the _U properties.
By changing instance names, you can easily add and change functionality to different parts of your background. But your job isn't quite over yet. You'll need to make sure each movie clip is set up with the proper elements for each letter you place after its name. That's what all those colored dots are for.
Double-click on mountains_L to open the clip. Click toward the top of the image and you should select an invisible movie clip with the instance name usableArea.
usableArea
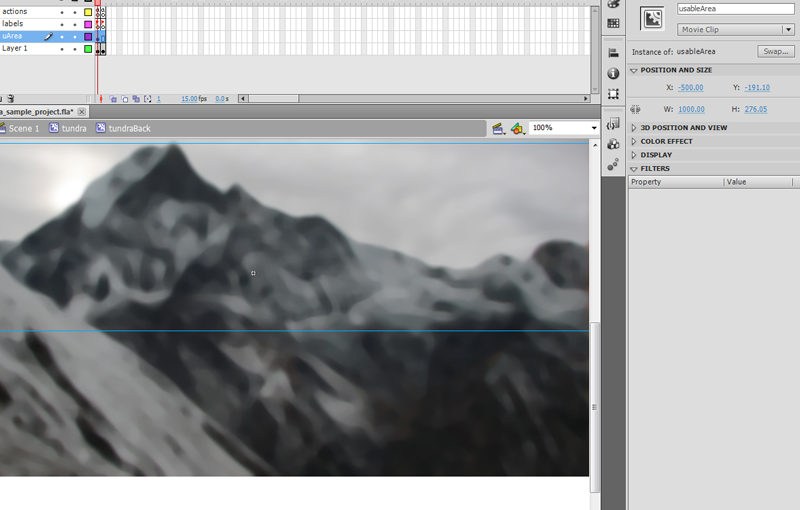
Double-click on usableArea and you'll see that the movieclip contains a simple rectangle with its alpha set to 0. This is the usableArea clip in the userInterface folder, a simple 100x100 square resized to fit the area we want. Since this mountain backdrop is very large, we set a smaller usable area for the player to click on so it doesn't conflict with other background elements. This area has to be rectangular; even if we draw a custom shape, Flash will only interpret the bounding box around it, so you're best off using a rectangle for accuracy.
You don't need to put usableAreas in your movie clips, but I recommend it. Keep in mind that Flash considers the hit area of any movie clip to be the bounding box around the entire thing - including all those dots and lines that I'll go over in a minute. Without a usableArea, the hit area will extend well beyond the visible part of your movie clip most of the time.
usePoint, nodes, and depthSplit
Navigate back to the tundra clip and let's take a look at rock_O_G again. Double-click on the rock and note the different layers. Like mountains_L, this clip contains a usableArea, but it also has a bunch of other stuff. The red dot is the usePoint, or the point to which the player will walk when the item is going to be manipulated, talked to, or (in this case) picked up. The black dots are nodes, each with a name corresponding to its position: nodeUL (Upper Left), nodeUR, nodeLL, nodeLR. These points define the perimeter around the clip; the player will walk to these points when navigating around an obstacle. The black line in the middle is the depthSplit, or the point at which the player either goes behind or comes in front of the object. All clips with the _O property need to have the four nodes and the depthSplit.
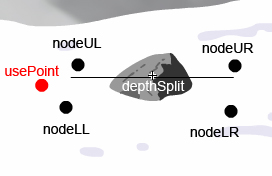
There's no real science to the placement of the nodes or the depthSplit; when you create a new obstacle, just keep playing with it until the player's movement around it looks natural.
proper
The rock itself is a movie clip buried under everything else and named proper. All clips with the _O property need to have a clip called "proper" in them, which is used to determine the object's hit area. This particular clip is an instance of rockProper, and if you check its Linkage in the Library you'll see it's exported for Actionscript with that name. The clip rockProper is the one that appears, and is dragged around the screen, when the player selects it from the inventory. You'll also see rockInv in the Library, which is the clip used for the rock as it appears in the inventory itself. All clips with the _G property need to have [item]Proper and [item]Inv clips, exported for Actionscript, in the Library. We'll see why once we open up Inventory.as later on.
Back in the tundra clip, let's look at the ground movie clip on the layer of the same name. This defines the area on which the player can walk. Every background needs a ground movie clip. This clip doesn't require anything special, just the proper instance name.
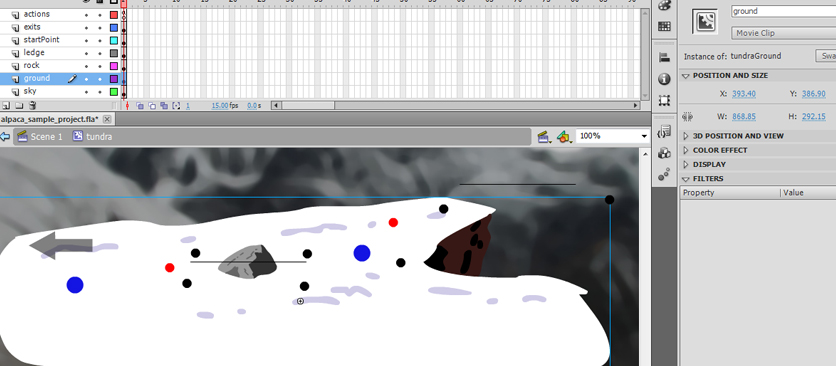
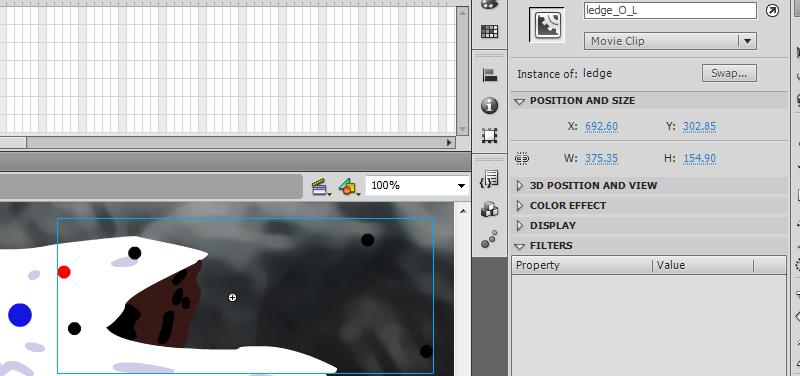
If you look at ledge_O_L, you'll see it's much like rock_O_G; the only difference is that it's not gettable. It still has a usePoint, because at the end of the demo the player is able to use the balloon on it. Since the ledge is not an actual physical obstruction but a gap, its depthSplit has been placed high above it, so the player will always appear in front of it (although, since it's invisible, this doesn't really matter).
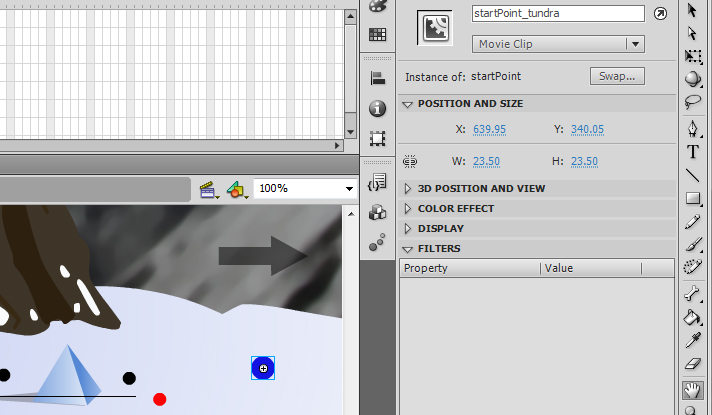
startPoints
On the startPoint layer you'll find two blue circles: startPoint and startPoint_hangar. The first defines the point where the player first appears when the game starts. The second defines where the player appears when they have entered from "hangar", the next background in that direction.
EXITs
On the exits layer, there's a single clip called EXIT_hangar. When the player clicks on this, they will walk to the corresponding startPoint - in this case, startPoint_hangar - and enter the next background upon reaching it. All exits need to be named in this format: "EXIT" followed by an underscore and the name of the next background. The name after "EXIT_" must match the name after "startPoint_".
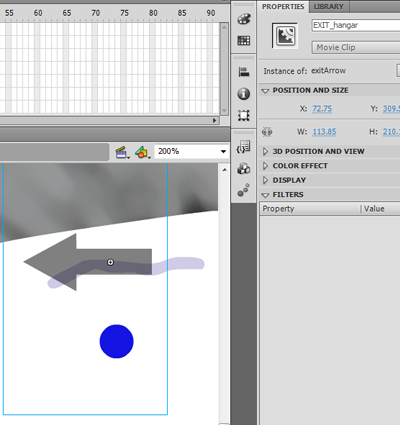
The next background will need a point called "startPoint_" followed by the name of this background. As an example, open up the hangar movie clip in the library and look at the right side. There's an exit called EXIT_tundra, leading back to the tundra background, and underneath is startPoint_tundra.
[
Back to the tundra clip for the final layer, "actions." This layer contains some code that creates the snowflakes in the background. It's completely optional, so don't worry about it for now. Backgrounds don't need an action layer at all.
OK, we just laid down a whole lot of rules for setting up a scene. It might seem overwhelming right now, but it'll get to be second nature as you build your own backgrounds. Let's review all of our ground rules for background so far.
Background Properties
Backgrounds must:
- Be movie clips
- Be exported for Actionscript
- Contain a ground movie clip
- Contain at least one startPoint
Lookable items must:
- Have instance names consisting of [display name]_L
Usable items must:
- Have instance names consisting of [display name]_U
- Contain a usePoint
Gettable items must:
- Have instance names consisting of [display name]_G
- Contain a usePoint
- Have corresponding clips named [item]Proper and [item]Inv in the Library, exported for Actionscript
Talkable items must:
- Have instance names consisting of [display name]_T
- Contain a usePoint
Obstacles must:
- Have instance names consisting of [display name]_O
- Contain four nodes establishing a perimeter
- Contain a depthSplit
- Contain a clip called proper that determines the item's actual physical presence
Exits must:
- Have instance names consisting of EXIT_[next background]
- Have a corresponding point named startPoint_[next background]
- Have a correspoing point in the next background named startPoint_[this background]
That basically sums up the requirements for background movie clips. Now we're going to look at some of the code that's running this whole operation. Keep the .fla project open - we'll be referring back to it as we go.
Before we dive into the code proper, let's take a quick look at our configuration file. It's called config.js and you'll find it in the data folder.
config.js
The config file is not very long and should be pretty self-explanatory. It's in JSON format, which is a nice simple way to store data as text.
{"gameURL":"alpaca_sample_project.swf",}
"useAudio": true,
"playerScale":"1",
"walkRate":"15",
"targetBuffer":"20",
"playerName":"Player",
"firstLocation":"tundra",
"musicURL": "audio/bgmusic.mp3",
"endMusicURL": "audio/ending.mp3",
"saveURL": "data/savegame.php",
"saveID": "alpacasample",
"thisVersion":"Version 2.1"
Each line of the file is going to be loaded into our game when it starts and used throughout the engine. The property names are on the left and the values are on the right, as you probably guessed. Here's a quick rundown on what each property does:
- gameURL is the .swf file that gets exported from our project. The container.swf file is going to load this, and show a progress bar as it loads. You don't actually have to use the container, but it's nice to have a progress bar so your users know that the game is actually loading and not missing or buggy.
- useAudio tells the engine whether we're using audio for the characters' lines, as opposed to just subtitles. This does not affect background music or sound effects placed directly in movie clips.
- playerScale affects how large the player movie clip appears in the game. If you create custom movie clips for actions (like when Al throws the rock at the door), this setting won't affect those - so I recommend sticking to 1, and just resizing your player clip manually. If you have a simpler game, though, this might be a quick way to do some tweaking.
- walkRate is the number of pixels that the player moves per frame.
- targetBuffer is the distance, in pixels, that the player can be from a clicked point on the ground before the walk action stops. We'll talk a bit more about this later on.
- playerName doesn't really do anything yet; I put this here to give the player a display name in case we want to use items on the player him/herself, which you can't do at the moment unless you tweak the code.
- firstLocation is the name (in the library) of the background in which the game starts.
- musicURL is the location of the background music. You can leave this blank (set it to empty quotes: "") if you don't have background music.
- endMusicURL is the music that plays over the end screen. You can ignore this if you plan to do an elaborate ending animation or anything custom like that.
- saveURL does nothing, currently. There's space in the code to implement external server-side saved games, but I didn't think it was worth putting together at this point.
- saveID actually does something - namely, it identifies the location of saved games in Flash's local memory. Make sure you change this to something unique when you make a new project so you don't get conflicts.
- thisVersion is just the current version of ALPACA. This is not very important.
All right, now for the actual Actionscript. We'll start with our document class, Engine.as.
Engine.as
Like all our Actionscript files, this can be found in the com/laserdragonuniversity/alpaca folder. This is the class that our game loads first, and it runs the show from that point on. Most of our game-specific variables are defined in this class, so ideally you should need to do very little altering of the other classes, if any at all.
The only .as file you need to alter to create your own game is Puzzle.as. All the other classes are designed to function dynamically based on your .fla project file and your configuration files, and require as little tweaking as possible. We'll get to Puzzle.as after this.
The top of the Engine class contains all this code:
package com.laserdragonuniversity.alpaca {import flash.display.MovieClip;
import flash.events.*;
import flash.display.Stage;
import flash.display.DisplayObject;
import flash.net.URLLoader;
import flash.net.URLRequest;
import com.adobe.serialization.json.*;
public class Engine extends MovieClip{
This is where we establish our class path, and import all the different Flash goodies that we need to make things function. None of this needs to be changed, so don't worry too much about it. The real meat comes after our class declaration.
Variables
public static var player:Player;
public static var back:Background;
public static var newBack:String;
public static var toolbar:Toolbar;
public static var inv:Inventory;
public static var options:Options;
public static var saver:SaveRestore;
public static var useBox:UseBox;
public static var puzzle:Puzzle;
private var opening:MovieClip;
private var ending:MovieClip;
public static var obstacles:Array = new Array();
public static var usableItems:Array = new Array();
public static var foreground:Array = new Array();
public static var exits:Array = new Array();
Yikes, that's a lot all at once. Don't be alarmed - we're just declaring all of our variables. The first block is almost all made up of our custom classes, the names of which should be self-explanatory. The newBack string will be used when the player enters a new background. All of these are public, static variables because the other classes will need to refer back to them and sometimes write to them.
The second block defines opening and ending, which are the movie clips that show up at the beginning and ending of the game. The third block defines the arrays that will keep track of our various background elements while the player explores the scene.
private var musicURL:String;
private var endMusicURL:String;
These two strings define the path to the music files used in the demo. Their values come from the external configuration file. I opted to have the music loaded from an external file in order to keep the .swf file size down. You can also embed audio in the background movie clips if you want it to change with every screen, but keep in mind that this will increase your file size.
private var saveURL:String;
private var saveID:String;
Like the music URLs, this value comes from the configuration file. saveID is used to name our saved games in Flash's local memory. You should give it a unique name so you don't overwrite the data from another project if you're saving games; this can disable the save feature until you clear the local memory. saveURL doesn't do anything right now, but in future versions it will point to the external script that saves games as separate files.
public static var useAudio:Boolean;
private var playerScale:Number;
private var walkRate:Number;
public static var targetBuffer;
public static var playerName:String;
public static var playerControl:Boolean = true;
public static var restoring:Boolean = false;
All this code will come from our external configuration file. useAudio is based on whether you're using audio for the dialog lines or not (sound effects and music are not affected). playerScale is the size of the player onscreen (1 being 100%, so .5 would be half size, and 2 would be double). It only affects the player during normal play, however - it won't change the player's size in movie clips, so make sure to decide early on how large your character needs to be!
walkRate is the number of pixels the player moves per frame while walking. targetBuffer is how close the player needs to be, in pixels, to be considered to have reached a given point. This needs to be here because otherwise the player will never exactly, down to the fraction of a pixel, reach the spot where the user has clicked. walkRate and targetBuffer need to work together to allow the player to move and avoid obstacles properly. Again, there's no science to this - it's going to vary depending on how large your player is, how large the background is, etc., so if you change these things you'll need to experiment with these values until movement appears to work correctly.
playerName will later be assigned to the Player class' .name property, and it's only used at the moment to identify the player as such to the Subtitle class. If you're going to change it here, make sure you change the reference in the Subtitle class so it can determine that the player is supposed to be talking.
playerControl is a Boolean value that determines whether the user can click on background items, move their character, or access the inventory and options. It's set to false whenever the player is performing an action or in the middle of a dialog, so the user can't screw things up by starting two movie clips at once.
restoring is a Boolean value that lets the Engine know if the background is being loaded from a saved game, and not from the player walking into a new room.
private var firstLocation:String;
public static var lastLocation:String;
The firstLocation variable tells the Background class which background clip to load first, when the game starts. This initial background clip needs to have a startPoint movie clip, or it won't know where to place the Player and it won't load.
The lastLocation string is used to remember which background the player just left upon entering a new one. Then the player can be placed at the proper entrance, if there are more than one.
public static var configData:Object = new Object;
public static var linesData:Object = new Object;
private var speechLoader:URLLoader;
private var configLoader:URLLoader;
These variables allow us to load external JSON files that contain all the text for the player's observations and dialog lines (we'll go over how those files are structured in a bit). This way, we can easily change those lines after we've already published the game, without having to recompile anything. If you choose to use actual audio clips for these lines, however, you will have to re-import them into the .fla file and then recompile the project. You can change the Speech class to grab those clips from external .mp3 files if you want, but I chose to export them with the .swf so there's no risk of lag time when the player starts talking. It's up to you.
Now for our last bit of variable declaration:
private var rmenu:RightClickMenu = new RightClickMenu();
The RightClickMenu class changes the context menu that appears when the user alternate-clicks on the .swf file, so we can provide a link to the ALPACA home page. Unfortunately, this only sometimes works, and I can't figure out why.
Now for our Engine function. It's a simple one, and the comments should explain it well enough.
Engine()
public function Engine(){/* This roundabout code is necessary to allow the exported alpaca.swf to be dynamically loaded}
into container.swf (that way we can make a load progress bar). We get errors without it.
This can cause movie clips to behave strangely sometimes - you may need to put code in certain
clips in order to ensure that they stay stopped on the first frame like they're supposed to */
addEventListener(Event.ADDED_TO_STAGE, startGame);
So the real code is in the startGame function immediately below.
startGame
private function startGame(e:Event):void{
}removeEventListener(Event.ADDED_TO_STAGE, startGame);
// Load external configuration data
var jsURL = new URLRequest("data/config.js");
configLoader = new URLLoader(jsURL);
configLoader.addEventListener("complete", configLoaded);
// Load all spoken lines
jsURL = new URLRequest("data/speechlines.js");
speechLoader = new URLLoader(jsURL);
speechLoader.addEventListener("complete", linesLoaded);
// Change the context menu to link back to the ALPACA home page
// This doesn't always work, for some reason
contextMenu = rmenu.returnMenu();
stage.addEventListener("changeBackground", changeBackground, false, 0, true);
We start by removing the event listener (an important step - things can get weird if you don't do that whenever you can) that set off this function. Then we grab our external data files: one for configuration settings, and one for all the dialog and spoken lines. Both these files will be decoded and applied to the project in the configLoaded and linesLoaded functions below. We add the custom context menu. The "changeBackground" event listener will pick up on the player leaving the background through one of its EXITs and change the background accordingly.
So now we see what happens to the external data that we just loaded:
linesLoaded and configLoaded
private function linesLoaded(e:Event):void{
linesData = JSON.decode(speechLoader.data);}
private function configLoaded(e:Event):void{
configData = JSON.decode(configLoader.data);}
useAudio = configData.useAudio;
playerScale = configData.playerScale;
walkRate = configData.walkRate;
targetBuffer = configData.targetBuffer;
playerName = configData.playerName;
firstLocation = configData.firstLocation;
musicURL = configData.musicURL;
endMusicURL = configData.endMusicURL;
saveURL = configData.saveURL;
saveID = configData.saveID;
createBackground(firstLocation);
createUI();// This needs to be here or Flash gets annoyed
useBox = new UseBox(stage, usableItems[0]);
// Add the intro screen over everything else
// This can be a fully animated intro if we want - anything that fits in a movie clip
opening = new introScreen;
opening.vtext.text = configData.thisVersion;
addChild(opening);
opening.addEventListener(MouseEvent.CLICK, removeIntro, false, 0, true);
The linesLoaded function is as simple as can be - all we're doing is assigning the decoded data to our linesData object for use later. But we need to use the configuration data right away, so the configLoaded function is longer. Basically we define our configData object and use its data to define all those configuration variables we passed earlier.
Then we use the createBackground and createUI functions to do what they say they do. We need to do it in this order to assure that the UI (the Toolbar, Options, and Inventory) are always on top of everything else. The useBox needs to be instantiated or we'll get errors; it won't actually appear on the stage. Then we add the opening movie clip on top of everything else and add an event listener to remove it once the user clicks. If you don't need an intro screen, you can just get rid of this code.
createBackground
private function createBackground(thisBack:String):void{
trace("Creating new background: "+thisBack);
var playerLoc:MovieClip;
back = new Background(stage, thisBack);
addChild(back);
obstacles = back.returnObstacles();
for (var i in obstacles)addChild(obstacles[i]);}
First we declare the playerLoc variable, which will be assigned to the appropriate startPoint in our background movie clip. Then we instantiate our Background class, passing to it the stage (this is the root level of Flash's display structure, and almost all of our classes need to use it) and thisBack, which is set at the beginning of the game as the firstLocation variable: "tundra." The Background class will now look for a movie clip called "tundra" in the Library (exported for Actionscript, remember!) and place that in the background. Then it will figure out what items are interactive and store them in appropriate arrays (we'll see how this works when we open the Background.as file). Once it's done this, we need to retrieve that data and store it in Engine's various item arrays in order to use it. So, we call the Background.returnObstacles method. The for...in loop then adds each obstacle to the display list. We need to use addChild in order to change the obstacles' depth value, allowing the player to walk behind and in front of them as appropriate.
if (restoring){
playerLoc = new MovieClip();} else if (lastLocation){
playerLoc.x = 0;
playerLoc.y = 0;
var lastLocName = "startPoint_"+lastLocation;} else {
playerLoc = back.currentBack[lastLocName];
playerLoc = back.currentBack.startPoint;}
This sets the player's location. If we're restoring a saved game, we just place the player at 0,0 (we'll be setting the player's location using the saved data shortly afterward). If the player got here from another background, we place them at the entrance corresponding to that previous background. If they just started the game, we place them at the generic startPoint.
player = new Player(stage, walkRate, targetBuffer);
if (playerLoc.x > stage.stageWidth / 2){player.scaleX = -playerScale;}else {player.scaleX = playerScale;}
player.scaleY = playerScale;
player.x = playerLoc.x;
player.y = playerLoc.y;if (restoring){
saver.dispatchEvent(new Event("repose"));}
restoring = false;
addChild(player);
player.addEventListener("playerWalking", startDepth, false, 0, true);
player.name = playerName;
Now we add the Player to the stage. We pass walkRate and targetBuffer to the Player class so it can use them in its movement calculations. Then we set the Player's scale so the Player appears facing away from the side on which they've just appeared. This calculation assumes that the Player is normally facing to the right. Remember to make your Player symmetrical so this doesn't look weird.
After that we set the Player's scale and location, do a little adjustment if we're restoring a saved game, add the Player to the display list, set its name and add an event listener for "playerWalking." This will call the startDepth function, which as we'll see below, continually arranges the depth of the Player and all obstacles to ensure everything is properly lined up in our faux-3D space.
foreground = back.returnForeground();
for (i in foreground){addChild(foreground[i]);}
usableItems = back.returnItems();
exits = back.returnExits();
for (i in exits){addChild(exits[i]);}
Just like we did with the obstacles, we've called methods from the Background class in order to populate Engine's item-related arrays. foreground and exits should be obvious, and needed to be added as children so their depth can be kept consistent. usableItems is every item in the background that has the _L property (or, you'll recall, the _U, _G, or _T).
// Add event listeners for all the usable items
for (i in usableItems){var thisClip = usableItems[i];}
thisClip.buttonMode = true;
thisClip.addEventListener(MouseEvent.CLICK, examine, false, 0, true);
thisClip.gotoAndStop(1);
This part adds functionality to all of those usableItems, allowing us to call the examine function when the user clicks on any of them. Setting their .buttonMode property to true makes the cursor turn into a little hand when we hover the mouse over them; it's not necessary, but it helps keep your game from turning into a pixel hunt.
back.currentBack.ground.addEventListener(MouseEvent.CLICK, movePlayer, false, 0, true);
This little line adds functionality to the ground in our background clip, allowing the player to move freely about the stage.
// Keep the toolbar at the highest depth}
if (toolbar){puzzle.newBackground(thisBack);}
changeUIDepth();
toolbar.addListeners();
// Remove any items the player has already picked up
var allInv:Array = inv.returnItems("all");
for (i in usableItems){for (var j in allInv){}if (usableItems[i].displayName == allInv[j].displayName)}
usableItems[i].visible = false;
This last block of code is only used if the toolbar is already on the stage - in other words, if this is not the first background the player sees upon starting the game. At this point we call the Puzzle.newBackground method to let that class know that we have entered a new background. It will then make sure that everything in this scene is set as it should be - if the player has already altered the background in some way, it will be properly altered and not revert to its original state. Then we call changeUIDepth so the toolbar and everything else remain on top of the background and characters. We call the Toolbar.addListeners method so that the toolbar will show descriptions when we roll over the usable items. Then, as stated, we make sure any item the player has picked up on a previous visit to this background doesn't reappear.
By now you should be getting a feel for how all this code works, so I'm going to just give some overviews of what each function does rather than explain it line-by-line. Hopefully my comments and variable/function names should keep things clear enough. That said, let's go over the rest of these functions.
changeBackground
This function is called when the "changeBackground" event is dispatched, which is normally when the player clicks on (and reaches) an EXIT. It removes the current background and all the children that have been added from it, then calls the createBackground function so it can set up the new background. You'll note that it removes the children both using removeChild and by setting the .visible property to false. For some reason removeChild doesn't actually get rid of the children; they can still be clicked on through the new background. Hence the redundant code. If anyone knows how to fix this, I'm all ears.
createUI
This function puts the user interface on the stage, namely the Toolbar, Inventory, Options, and Save/Restore. It adds them to the display list, sets their coordinates, and then makes the Inventory, Options, and Save/Restore invisible (they'll appear once the user clicks the appropriate toolbar buttons). This function also instantiates the Puzzle class, which keeps track of the player's progress through the game - what puzzles have been solved, what actions performed, etc. Finally, it adds an event listener for "endGame", which in our case is dispatched by the Puzzle class once the player has solved the final puzzle.
removeIntro
This does exactly what it says, and then it calls the Puzzle.firstAction method, which in our case has Al speak his first line of dialog.
movePlayer
This starts the Player moving if the user has clicked on a spot on the ground, or elected to use/talk to one of the background elements. It only does this if playerControl is set to true. It also makes the UseBox disappear if it's currently on the stage.
examine
This function adds the UseBox to the stage when the user clicks on a usable item. It only does this if the player has no ENTER_FRAME listener - that is, as long as the player is not currently moving. It also dispatches the "itemClicked" event, which will cause Subtitle, Options, and Inventory to disappear if they are currently visible.
startDepth
This is just here to add an ENTER_FRAME event listener that calls checkPlayerDepth.
checkPlayerDepth
This function runs continously as long as the player is walking. It checks the Player's depth in relation to all the obstacles in the scene. If the player's depth needs to be changed, it calls changePlayerDepth.
changePlayerDepth
This function sets the Player either behind or in front of the supplied movie clip as needed.
changeUIDepth
This function makes sure the user interface is at the highest depth. It does this by resetting everything on the stage, in decreasing order of depth, to an index of 0. This pushes the other items up the index until they're all lined up properly. It has to call the Background.gotoBack method for the background movie clip, because it's a child of the Background class and not the Engine.
endGame
Simple function to add the ending movie clip over everything else, and to change the background music to the one specified by endMusicURL.
And that's our Engine! Let's move on to the Puzzle class to see how we structure the user's game progress.
Puzzle.as
Variables
The Puzzle class has a whole bunch of variables, most of which should be easy enough to figure out. But one in particular might stand out to you: allPuzzles. This is, as you'd imagine, an object that contains the status of every aspect of all of the game's puzzles. Basically I'm treating anything you can change in the game world as part of a puzzle. Down in Puzzle(), we can see how this works.
Puzzle()
In the interest of organization I set up the allPuzzles object with a separate sub-object for each background in the game: allPuzzles.room, allPuzzles.hangar, and allPuzzles.tundra. This seemed like an easy enough way to break up the data and to ensure that each background, when loaded, looks the way it's supposed to. When you create your own game, you can choose to store the data in this way for each of your own backgrounds, or come up with your own system if you prefer, but make sure you keep all your data in the allPuzzles object, since it's used to save games.
Each sub-object has custom properties that will make sense if you've played through the demo.
- allPuzzles.tundra has two properties:
- skyWeird - this Boolean keeps track of whether the sky has been flipped by the user pushing the button inside the room. There's no gameplay reason to do this; this feature is just to demonstrate an object that can be used without a custom animation movie clip.
- skyWeirdCount - this integer keeps count of how many times the sky has been shown to the player in its altered state. It's only there to make sure that Al the panda only says "whoa" once.
- allPuzzles.hangar has one property:
- doorBroken - a Boolean that keeps track of whether or not the player has thrown the rock at the door
- allPuzzles.room has five properties:
- sphereUsed - whether or not the player has used the pyramid on the sphere
- boxUsed - whether or not the player has used the (sharpened) pyramid on the box
- gotBalloon - whether or not the player has used the box after breaking it open with the pyramid
- switchOn - whether or not the switch is currently on
- usedSwitch - whether or not the player has ever pushed the switch
We'll see how each of these comes into play when we get to the newBackground function below.
We set pretty much all our room object properties to false when Puzzle is first instantiated, which happens at the beginning of the game. Note that we also have to set variables to refer to the background, inventory, etc. so Puzzle needs to be the last thing we instantiate in the Engine function, after all our other elements are already present.
returnPuzzles
This function simply returns the allPuzzles object. It's used by the SaveRestore class to save games.
restorePuzzles
This sets the allPuzzles object to match saved data. It's used by SaveRestore to restore games.
firstAction
This is something of an optional function; all it does in this demo is give Al the Panda his first line. Originally I just did this from Engine.removeIntro, but this led to a bug that I was never able to figure out, in which the first subtitle sometimes refused to go away. Moving the functionality to the Puzzle class seemed to fix the problem, although I couldn't tell you why.
newBackground
This function is called whenever the player enters a new background (including when a game is restored), and its job is to check the corresponding puzzle object (allPuzzles.tundra, allPuzzles.hangar, or allPuzzles.room, remember) and then set up the background accordingly. For example, if the player uses the rock on the door, then goes back to the tundra, the door will still be open when they return to the hangar background. You'll want to create new such sub-objects for any new background you create, and put the pertaining instructions within this function.
You'll notice my frustration in the comments with the way I set variables for the various scene elements (the rock, pyramid, box, etc.) - I couldn't figure out how to call them based on their displayName property without this goofy for...in loop. I'm sure there's an easier way to do it, so feel free to change it if you know how. And don't bother with the .name property, because the objects get inconsistent instance names when they're added as children.
gotItem
As the comment says, there's no code here, but it gets called every time the player adds an item to the inventory. So if you need something special to happen when a particular item is received, you can put it in here.
usedItem
This method is called whenever the player uses an item but no custom movie clip is used; in this demo, that only occurs when the player uses the switch. Since the switch can be used more than once, there are a bunch of conditional statements here to make sure that the switch behaves properly.
performedAction
Just like newBackground, this will be called whenever the player performs a context-specific action (i.e. one of the movie clips in the alpaca.swf Library that's under the actionMCs folder). All these movie clips are called by the PlayerAction class, and this function gets called after the clip is finished playing. Then it sets the background to react properly to that action; for example, when the player uses the pyramid on the box, it makes sure the box's movie clip is set to the frame open, so it has the tear on top. It also set's the box's lookTag property to "2," so when the player looks at the box, a new description will be used (more on this functionality in the Speech and Subtitle classes). And it changes the properties of the background puzzle objects accordingly, like roomPuzzle.boxUsed in this example.
spokeDialog
Yet another empty method; this gets called each time the player and another character get through a dialog option. If you a puzzle can be solved through dialog - say, convincing someone to get out of your way - then this is where you can put the corresponding code.
And that's it for Puzzle, at least at the moment. This class is designed to be open-ended and completely customizable, so if you need some random bit of code for anything in your game to work, here is probably the place to put it. Like I said before, the rest of the classes we're about to go over should not need to be changed at all for your brand-new game to function. Of course, they can be changed in any way you like, but if you're happy with ALPACA's functionality then you shouldn't need to bother with them. For that reason I'm going to give even briefer overviews for all these; to really sort out how they work, you'll need to dive into the code itself, which hopefully is easy enough to understand on its own. We'll hit these in alphabetical order.
Background.as
The Background class loads backdrop movie clips from the library, then adds functionality to all the significant items (obstacles, lookable and gettable items, EXITs, etc.) based on their instance names. It's not associated with any single movie clip in the alpaca.fla library.
Dialog.as
This class controls all the back-and-forth dialog in your game. If the user selects the Talk to [character] option during play, this gets called; it also gets called in some cases when a player uses an item on any talk-to-able character (like using the pyramid on the door). It takes all of its instructions from the data/speechlines.js file, so let's go over how that file is structured:
speechlines.js
The speechlines.js file contains all the lines spoken in the demo, including Al's obvservational remarks and the full dialog with the door. This is where the text for the subtitles comes from, but you'll need it even if the subtitles are off - it tells the Dialog class how many lines are in a particular exhange, among other things.
The various lines of dialog are within the "dialog" object, arranged by character (in this case, the DOOR is the only character).
"dialog":{
"DOOR":{"talk":[{"option": "Hello light circle door thing!",},
"response":[
["door","I'm not going to acknowledge such a dumb greeting."],]
[ "player","I'm not going to acknowledge such a sassy response."]
The character name has to match the character's displayName property. That property is an all-caps version of the first part of the character's instance name within the .fla file (in this case, door_T).
The option property shows the line that will appear as an option for the player to choose; it's also the first line the character will say. All the lines that come after that are contained in the response array that follows. Each line in this array is a sub-array containing the character who speaks, followed by their line. Despite the names, right now the class only differentiates between "player" and "not player." If it's not the player talking, the Dialog class defaults to the character that the user clicked on when the dialog started. If you want another character in the scene to take part in the discussion, you'll need to tweak the code.
In the case of the second option, a new menu with a new set of dialog options is created using the submenu property.
{},"option":"Can you open this door?",
"response":[
["door":"I can, but you have to say the password."]],
"submenu":[{]
"option":"Fruenlaven.",},
"response":[["door","Nothing doing, Yakko."]]
{"option":"Mirelurk stew.",},
"response":[["door","Go nuke yourself."]]
{"option":"'The password.'",},
"response":[["door","There goes any respect I might have had for you."]]
{"option":"I don't know it.",}
"response":[["door","I appreciate your honesty."],]
["player","Really?"],
["door","No! Piss off!"]
Once the player selects an option from this submenu and the dialog runs its course, they'll be taken back to the original menu. Nested submenus are not currently supported, but they would not be too hard to add.
You'll note that the fourth option has an action property:
{
"option":"Never mind.",}
"action":"end"
If any option has an action property set to "end", then the dialog will be over once the last line is spoken.
A little farther down we find a useObject property, which allows us to initiate dialog by using an item on a character:
"useObject":{"PYRAMID":[}
["player","I wield the mysterious pyramid! Allow me passage!"],]
["door","YOU...SHALL NOT...PASS!"],
["player","Curses!"]
Again, this will work based on the displayName property of the object used. When the user tries to use an inventory item on something, the DraggedItem class will automatically search the speechlines.js file for a dialog option (after first looking for an action movie clip, but we'll get to that in a moment), so you can create these dialogs simply by adding to the JSON file.
Using Audio Clips for Dialog Lines
Of course, you may also want to use full audio for your characters, in which case you will also need to put the associated audio clips into the .fla file and export them for Actionscript.
I also experimented with some code to grab external .mp3 files for each line. I decided not to go with this technique because there was noticable lag time while the .swf loaded the audio, and it made things sound awkward. But I left the code commented out, if you want to try to implement it yourself.
As it stands now, you'll need to import the audio clips individually to the .fla file. The names need to follow this format: dialog_[target character's displayName]_[option number]_[line number]. Option and line numbers, like array indexes, start at 0, not 1! You can change this if it annoys you, but I found it made for cleaner code.
So, for example, if you talk to the door and pick the very first option, the first audio clip played will be dialog_DOOR_0_0. This will be followed by dialog_DOOR_0_1, and then dialog_DOOR_0_2. At that point the Dialog class will see that the XML file contains no more lines for that option, and stop.
For submenu options, the format is this: dialog_[target character's displayName]_[option number]_SUB_[suboption number]_[line number]. So for our first suboption name in this example ("Fruenlaven"), we'd use dialog_DOOR_1_SUB_0_0.
If you don't want to use audio, set the "useAudio" property in data/config.js to false and the audio-related code will be ignored.
DraggedItem.as
This class allows the user to drag inventory items over the stage and attempt to use them on different objects. It gets called when the user selects the "use" option on any item in the inventory. It grabs [item displayName]Proper from the library (remember our earlier discussion about this), places it under the mouse cursor, and then hides the mouse so the user only sees the item being dragged around. A Glow filter is applied when it passes over an item in the Engine.usableItems array.
When the user clicks, it checks to see if it's currently over any of the usable items. If it's not, it disappears, and player control returns to normal. If it is, it checks to see if the player can use it. This is done in three steps:
- DraggedItem searches the library for an action movie clip (actionMC), like the ones in alpaca.swf's actionMC folder. If it finds one, it instantiates a playerAction object to handle that movie clip. If it doesn't...
- It checks to see if there's dialog resulting from this combination. For example, in the demo, if the user uses the pyramid on the door, a dialog results. DraggedItem looks through the JSON file to see if this is an option. If it's there, a Dialog is instantiated. If it's not...
- It instantiates a Speech object so the player will comment on why this didn't work. The Speech class will take care of the rest.
Inventory.as
The Inventory also appears a movie clip in the alpaca.fla library. You can edit its look there. All the inventory items, however, are dynamically loaded from the library as the player gets them. These items need to be named using the format [item name]Inv, so remember to add one of these each time you create a Gettable item.
The Inventory only supports two rows of eight items total right now, and no scrolling; for games with a lot of inventory items you might want to add that functionality.
Items are automatically arranged based on when they were picked up, and get rearranged when the user eliminates an item.
The Inventory will check to make sure that an item has not already been picked up whenever the player gets something. This is important because players can sometimes override the grabbing animation by clicking elsewhere on the stage, and this can result in duplicate items.
Muzak.as
This is the background music class for the game. It loads a provided external .mp3 and plays it, looping it once the sound clip ends.
It can also change the volume of the music and stop it completely. It can't load a new music file; the Options class does that by instantiating a new Muzak object.
Options.as
This class controls the options menu, which you'll also find in the alpaca.fla library. There are four different controls:
Subtitles
The on and off buttons control the value of the subtitlesOn Boolean in the Options class. The Speech class will check this variable (using the public getSubStatus method) before creating a subtitle whenever the player or another character speaks.
Music Volume
This slider will update the Muzak class with a new volume value as long as the user is dragging it.
Speech Volume
This slider will update the speechVol variable within this class as the user drags it. The Speech class will check this variable using the returnVol method before any line of speech is played; speech volume won't actually be affected while any line is playing.
Animation Speed
This actually just changes the framerate of the .swf file. The values stretch from 5 to 25 fps. This is my nod to a feature in some of the old Sierra games that let you speed up how fast your character walked, so you wouldn't get too bored as you traversed the same screens over and over.
I've encountered a bug where Flash locks up sometimes when changing the framerate. This only seems to happen while previewing the demo in Flash, and not while running the .swf file through Flash player, but it's worth looking into if it's a widespread problem.
Player.as
This is one of the most complicated of all the classes; it deals almost entirely with the Player's movement. The player is set to walking via the public method startWalking, which takes in the X and Y coordinates to which Al needs to walk. His movement toward that point is a matter of simple geometric math, but it's the obstacles that make things complex.
In an nutshell, the Player class starts moving Al in a straight line toward his goal, while constantly running a hit detection check with every item in the Engine.obstacles array. If it detects a hit with any item, it determines where the Player movie clip is located in relation to the obstacle. It does this by essentially drawing a cross at the center of the obstacles and dividing the stage into corresponding quadrants. So the Player will be either on the Upper Left, Upper Right, Lower Right, or Lower Left of the obstacle. Then the target coordinates are assigned a quadrant based on where they lie in relation to the obstacle.
Based on this, the Player class then figures out a path along the different nodes (remember those?) that will take it most sensibly toward the target coordinates. There's not a lot of science to this; I just figured out which path seemed the most sensible on my own and used a big switch statement to assign the proper one. It's far from perfect, but it generally works well enough.
The Player will then be sent to each node in the proper order. Once the Player has naviagated around the obstacle, a new path is calculated to the target coordinates and we're back to where we started. The hit detection is still running, so the Player can navigate around as many obstacles as you'd like.
One point to remember: keep the obstacles a good distance from each other. The whole system is bound to fail if the Player tries to navigate around two obstacles at once. In fact, depending on your design, you might not need to create any obstacles at all.
PlayerAction.as
This class deals with instantiating unique movie clips for actions the user performs. You can find the movie clips in question in the actionMCs folder in the alpaca.fla file. When Al throws the rock at the door, or punches the pyramid through the box, these are the clips you see, and they're all controlled by this class.
The PlayerAction class sets the Player walking toward whatever the target is that will be associated with the movie clip. Once the Player has reached the target's usePoint, it will make both the Player and the target item invisible and place the appropriate movie clip from the library onto the stage. At this point the mouse cursor will disappear and the user will not be able to control anything until the clip is finished (Engine.playerControl will be set to false).
Each movie clip in the actionMCs folder has an action placed on its final frame:
stop();
dispatchEvent(new Event("clipFinished"));
This is the only way that the PlayerAction class knows the movie clip is finished. Make sure you don't forget it!
Once the clip is over, PlayerAction removes it, makes the Player and the target visible again, and returns control to the user. Then it notifies the Puzzle class that this action has been performed, so any results of the action are determined there.
PlayerAction doesn't scale or position the movie clip in any way, so you have to make sure on your own that it lines up properly with your background.
RightClickMenu.as
As I've mentioned, this class is only semi-functional. It changes the context menu that appears when the user alternate-clicks on the .swf in order to provide a link to the ALPACA site. Depending on what the user clicks on, though, the changes might not appear. It's not mission-critical, so I haven't had time to fix it.
SaveRestore.as
This class deals with saving and loading games. You'll find it as a MovieClip in the project's library, and you can edit its look there.
Most of the code here deals with the funcionality of the Save/Restore dialog box - the actual saving and restoring is relatively simple. SaveRestore simply grabs the player's current location, the puzzle settings from the Puzzle class, the options settings from the Options class, and the player's inventory (both current and historical) from the Inventory class. Then it writes these into an object, encodes this as a JSON string, and saves it to Flash's local memory, which functions a lot like browser cookies. Restoring simply brings this data back up and distributes it to those three classes, which each have their own methods for restoring it.
An important note: saved games will not last forever. I'm not sure how often Flash player wipes its local memory, but don't count on players being able to access these saved games a year from now. Also, since this is local memory, the Flash player on the user's computer stores the data. They won't be able to access their saves on another computer.
There's some places in the code set aside for implementing external save games - basically the JSON string would get sent to a server-side script, which could write the game to a .js file, and this could be accessed later for restoring the game. This wouldn't be hard to do; the tricky part would be figuring out how to ID and organize the saves. Probably a login screen at the beginning would be necessary, so players could access their saves from anywhere. Naturally this would require a lot of extra work, and for games that take less than an hour to complete, it's probably not necessary. But it's a good idea in theory and I'd encourage people to take a crack at it.
Speech.as
The Speech class handles all the player character's non-dialog lines. It's set up to function with and without actual audio. This demo uses audio, but setting useAudio in the config.js file to false, you can easily change this. If you do choose to forgo audio, you might want to remove the on/off controls for subtitles in the Options class.
There's also some commented code in here that will grab all the audio lines from external .mp3s instead of the library. As I said earlier, this can create some serious lag, but it will keep the .swf file size down if that's a priority for you.
Speech will search the library for an appropriate audio clip; if it doesn't find it, it will default to the [target item name]_usenot line. If it doesn't find that, it will finally default to the generalNo line (in this demo, that's "Nah, I don't think I'm gonna do that").
If you're not using audio, it will do basically the same thing, but with the speechlines.js file.
The Speech class will also make use of the lookTag attribute, if the target item has one. This allows you to change the description of something once the player has altered it - like the box, once it's open, and once the player has removed the balloon. You can keep changing the lookTag as much as you like, and you're not limited to numbers, although I found that easiest.
"look":"It's a box. Apparently an extremely boring one.",
"look2":"It's still boring, but now it's boring with a big hole in the top!",
"look3":"That's the box I got the balloon from. I take issue with the label.",
As you can see, this part of the speechlines.js file (everything within the observations property) arranges all the lines based on the target item. If you use an inventory item on something, the line will be under the target, with a tag in the format: "used[ITEM]"
"look":"A mysterious pyramid. It's oddly compelling...",},
"look2":"That is one super-sharp pyramid!",
"get":"I'm sure I can find a good, mysterious use for this.",
"useHANGAR":"This thing doesn't need a whole hangar to store it.",
"useLEDGE":"This thing is much too mysterious to just hurl off a cliff like that.",
"useWALL":"I'd hang this up, but I don't think the colors would match.",
"useBOX":"It's not quite sharp enough. I know it looks like it is, but it isn't. Trust me.",
"useSPHERE22":"The pyramid is sharp enough.",
"usenot":"I don't think I need to rub a pyramid against that."
You'll notice something a little weird at the bottom - "useSPHERE22". No, that's not the 22nd lookTag that's been added to it - it looks like that because both the pyramid and the sphere have lookTags of "2" at this point, and both are automatically concatenated to the end of the string. It's messy, but I was too lazy to fix it, since it doesn't come up often.You may feel otherwise.
Subtitle.as
This class, naturally, creates subtitles. It does all the drawing with code, so it's not associated with a library movie clip. It uses a supplied lineID to track down the appropriate text within the speechlines.xml file. Then it draws a box to fit the length of the text. The box gets placed either over the Player or over the target character (during a dialog). There's some code here to nudge the box inward if it strays outside the edges of the stage.
If sound is being used, the subtitle will remove itself once the audio clip is finished and the Speech class dispatches the removeSub event. If you're not using sound, the subtitle will stay in place until the user clicks (although the Player's mouth will stop moving after an interval based on the length of the text).
Toolbar.as
This class is attached to the Toolbar movie clip in alpaca.swf. It controls the buttons that bring up the inventory and the options menu. It also places text on the lower right of the screen to indicate each thing the player is mousing over, or actions they can perform ("Use PYRAMID on DOOR", for instance).
Usebox.as
The Usebox class is attached to a movie clip in alpaca.swf. It's the crux of ALPACA's interactivity, but it's not as complicated as it might look. As you saw when you played the demo, the Usebox gets instantiated any time the user clicks on an interactive item. As soon as it appears, a 2.5-second timer starts. If the user doesn't click on either button in that time frame, it will disappear. It also disappears when the user clicks on something else.
The right-hand button will be set to "use" by default, but change to "talk" if the target item (the door, in the demo) is talk-to-able.
If the user selects the "look at" option, it will simply create a Speech object for the appropriate line. If the user chooses to use or talk to the item, it will check to see if the item is in fact usable (remember, talkable items are usable by default). If it's not, it will have the player speak the [item display name]_use line.
If the item is usable, the Player will be sent to its usePoint's coordinates. Once the Player is there, the Usebox class will have the player pick up the item (if it's gettable), start a Dialog (if it's talkable), or manipulate the item (if it's just usable).
To manipulate the item, the Usebox class looks for an appropriate action movie clip in the library. If it finds one, it creates a PlayerAction object to handle it. If it doesn't, it defaults to the Player's grab animation. In the demo, the latter option is used when the user pushes the switch inside the room.
Once the appropriate action has been taken, the Usebox removes itself from the stage.
Summary
And that's our tour through ALPACA 2.0! Remember, you can change anything and everything in this code to suit your tastes and needs. But if you're not one for heavy programming, you can do most of your game design using just the .fla file. Down the road, I may try to create a more intuitive API for putting together puzzles and functionality, but first I'll see how people react to ALPACA as it is. As with any open source project, contributions are greatly appreciated.
Possible Future Improvements
There's a lot that can be done with ALPACA 2.0, but there are also a wealth of possible features that could be added to give designers more freedom. Here's a list of some that struck me while I was finishing up this version; think you can write these in? Go for it!
- Scrolling backgrounds. Right now backgrounds are static, and limited in scale. Creating scrolling backgrounds would be tricky with the current obstacle-avoidance system, but could be worth the effort.
- Expanded dialog options. Multiple characters, nested suboptions leading to more conversation branches, and the like could make this system more robust.
- An external file for all the Puzzle class's settings. Having to rework the code and recompile the project every time you want to change the gameplay can get cumbersome. I'd love to be able to put all the Puzzle sub-objects into an external JSON file and make things easier to manipulate, but it would mean a lot of clever retooling, so I didn't have time for it yet.
- External save games. See my description of SaveRestore above.
- A more dynamic art asset system. If backgrounds and other art were pulled from external files, it would be easy to change assets to suit your taste without having to re-export the .swf file.
- A context menu that actually works. I was stumped by this one, but if you can get RightClickMenu to work fully, I owe you a beer.
That's just a preliminary list to get some ideas rolling. The sky's the limit.